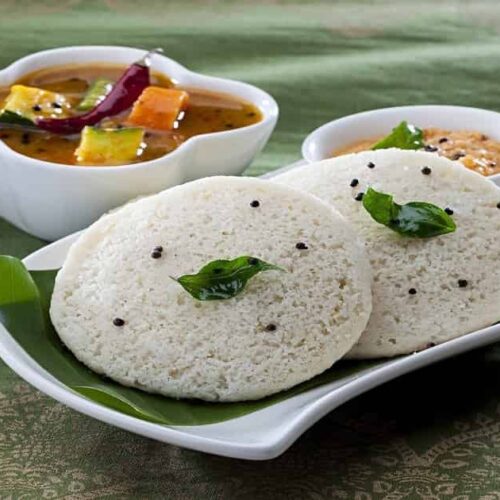
Idli is a type of rice cake that originates from the southern states of India. It is a savory rice – lentil cake that is generally consumed with certain dips like coconut chutney and sambar. Idli is white and has a spongy and soft texture and tastes slightly sour due to the long hours of its fermentation.
Considered as one of the best food items which can be consumed as breakfast, Idli is a dish included in the staple diet of South Indians. Idlis are available in many varieties which include simple rice Idli, Rava Idli, instant Rava Idli, dried fruit stuffed Idli, ragi Idli, poha Idli, oats idly, and butter Idli many more.
As simple as the name is, the process of making Idli also is pretty simple but the taste depends on your skills in cooking the dish. If you own the best idli maker, the process would be effortless. The batter should be of perfect consistency and perfectly fermented to get delicious Idlis.
Idli Making at home: At a Glance
Preparation time: 15 hours
Soaking time: 5 hours
Fermentation Time: 8 – 10 hours
Cooking time: 30 minutes
Serve: 4 adult people.
Ingredients to Make Idli
- 1 cup of rice (preferably basmati rice)
- 1 cup of parboiled rice
- ½ cup urad dal (whole or split)
- ½ cup of thick poha
- ¼ teaspoon of fenugreek seeds (methi seeds)
- Salt as per taste
- Oil (for greasing)
- Water for soaking urad dal and poha (3 cups), for grinding urad dal (½ cups), water for soaking rice (1 cup for basmati rice and 1 cup for parboiled rice) and for steaming Idlis (2 ½ cups)
Make Idli Using an Idli Maker
Equipment
- Mixer Grinder
- Electric Beater
- Idli Maker
Ingredients
- 1 cup Basmati Rice
- 1 cup Parboiled Rice
- ½ cup urad dal (whole or split)
- ½ cup Thick Poha
- ¼ teaspoon Fenugreek Seeds (methi seeds)
- Salt Add as per taste
- Oil For greasing
- 8 cups Water For soaking urad dal and Poha (3 cups), for grinding urad dal (½ cups), water for soaking rice (1 cup for basmati rice and 1 cup for parboiled rice) and for steaming Idlis (2 ½ cups)
Instructions
- The urad dal, as well as fenugreek seeds, need to be rinsed thoroughly before using it to make Idlis.
- The rice, both parboiled rice as well as basmati rice are washed thoroughly together at least 3 – 4 times.
- The rice, both parboiled rice as well as basmati rice are washed thoroughly together at least 3 – 4 times.
- The washed basmati and parboiled rice need to be soaked in 2 cups of water so that it increases at least 1 ¼ times more in size. The rice also needs to be soaked for 4 – 5 hours.
- Drain both the urad dal mix as well as the rice mix separately. Do not throw away the soaked water.
- The urad dal, fenugreek seed and poha mix then has to be ground by transferring the mix to a mixer grinder or wet grinder jar and grinding it smoothly and in perfect consistency by adding the reserved soaked water from the dal mix. The final batter should be fluffy and light.In present days, many people use a stand mixer or an electric beater to get the mixing process done after grinding.
- The soaked and drained rice now requires to be ground. The grinding of the rice needs to be done slowly and in 2 – 3 installments. Add water gradually and in little amounts to obtain a batter with a coarse texture.
- Once both the rice and the urad dal mixture have been ground, both the batters now need to be mixed.
- To the mixture, salt, preferably rock salt needs to be added as per your preference. An appropriate quantity of 1 teaspoon of salt can be used. Mix the salt very well in the mixture.
- On appropriately mixing the salt, the mixture now needs to be preserved and covered with a cloth and kept for 8 – 10 hours for getting fermented. Here comes the twist, in case you live in a cold region, do not add the salt before fermentation. Instead, let the mixture ferment first and then add salt to the mixture. In fact, in colder regions, the time required for fermentation is more than average and may range up to 12 – 24 hours, depending on the climate. Salt is the best ingredient that can be used for the fermentation of the Idli batter. The use of any other alternatives like baking soda, active yeast, or baking powder should be avoided. After being fermented, the batter rises and becomes very fluffy.
- The Idli mold now comes into action. Firstly, the Idli mold needs to be greased with oil. Then, the Idli batter must be poured into the Idli mold in proper quantities so that you neither overfill or underfill it.
- Use an Idli maker to get the best results when you are steaming the Idlis. The Idlis should be steamed in 2 – 2 ½ cups of water and for 12 – 15 minutes on an average. The timings required to steam the Idli varies depending on the present weather as well as the quality of the Idli making equipment you are using. Be sure to steam the Idlis in medium flame and not a high one.
- The Idli when completely seamed will yield a clean toothpick pierced in the steaming Idli. If the toothpick comes out wet, some more time for steaming Idli is needed. When done steaming, take the Idlis out using a spoon.
- The Idlis, once completed, must be placed on a plate and served immediately along with some sambhar, curry leaves and coconut chutney.

Conclusion for Idli making process
Although making Idlis seems very simple, it requires great skill and experience in this area. With practice and application of the right cooking methods, Idlis ferment perfectly tastes heavenly and gets the perfect spongy texture too.
Idli is one of the most body-friendly Indian breakfast items that contain low-calorie yet rich protein. So, you can make yummy and healthy Idlis at home too by using the required ingredients and a suitable Idli maker.
Related Posts: